I got a free Android phone, the HTC magic, with my cheap phone contract. Android is fantastic, but I’ve always wished my HTC Magic had a keyboard so I could type and play games more easily. I wondered if I’d be able to ever get an external keyboard, or even a gamepad, and clip it on.
Well, now you can. Tiny bluetooth keyboards (and their drivers) that work with an Android phone are a bit expensive and unreliable at time of writing, but there is a cheap game controller: the BGP100 bluetooth gamepad. I bought one to try it out.
Getting it to work was tricky, though – this is all pretty new, and I couldn’t find a good “how-to” guide. So I wrote one:
- Buy a BGP100. I got mine from dealextreme.com for $25 USD (worldwide shipping was free). [Update: looks like they’re sold out! Please check comments for other suppliers (and comment if you find a good one).]
- Download the Gamepro driver from the Android Market (or install the .apk)
- Switch Bluetooth on, if it isn’t already. For my HTC Magic (Android OS 1.5 I think) I press Menu, choose Settings, Wireless controls and tick Bluetooth.
- Enable Gamepro in you phone settings. For my phone, I press Menu, choose Settings, Locale & text, and tick MMG GamePro. Below that should be MMG GamePro Settings.
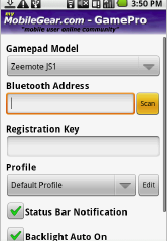
- Open MMG GamePro Settings. Choose your Gamepad Model (Gamepad BGP100 for me, but Zeemote JS1 works too).

- Scan for your gamepad by pressing scan to get the Bluetooth Address (switch it on first – on the BGP100 the power switch is a sliding switch next to the R button). You’ll need that address later, write it down.
- Skip the Registration Key for now. Leave it blank; first we need to test that everything works.
- Hit [Save] to save your GamePro settings.
- Change Android’s current “Input Method”. Right now your phone is using a virtual touch keyboard (or physical keyboard if you have one) as it’s Input Method. To change it to GamePro, long press on almost any standard textbox (for example, start the standard android messaging app, create a new message, press and hold inside the “To” field) and hit Select input method and choose MMG GamePro. Then quit that app. Note that you will have to change the input method back after playing. (I haven’t found a convenient way to do this yet – anyone want to write a widget that toggles bluetooth and the input method?)
- Test. You should now be able to go to the Android home screen and use the d-pad (or joystick) to highlight icons.
For more info, get the PDF of the official manual (on the “download” tab). It’s a bit confusing and some steps are missing, unexplained, or out-of-order (hence the need to write this) but it has some screenshots, and more details on several of the steps.
Have fun! I plan to post instructions on getting it to work with Snesoid (and other Yongzh emulators), let me know if you’re interested. Any questions or problems, please leave a comment.
