Why Valve is not a publicly traded company

Valve is a very successful company. They make more money per employee than Google, Apple, and Microsoft.

Gabe says being privately owned is a huge part of what makes Valve so successful:

There’s the customer… the person that you’re trying to make happy. From the time that you make a change in a product, it’s fifteen minutes – worst case – before a customer is actually using that. There’s no approval process…

You don’t go to board meetings where the board argues about what the third series of venture capitalists are worried about, dilution and hitting certain targets…

The whole point of being a privately held company is to eliminate another source of noise in the signal between the consumers and producers of a good.

See the full quote here: http://youtu.be/Td_PGkfIdIQ?t=14m51s

The whole talk (http://youtu.be/Td_PGkfIdIQ) this is from is extremely eye-opening. Must-watch for anyone even slightly interested in gaming – or technology, or business, at all – in the 21st century.
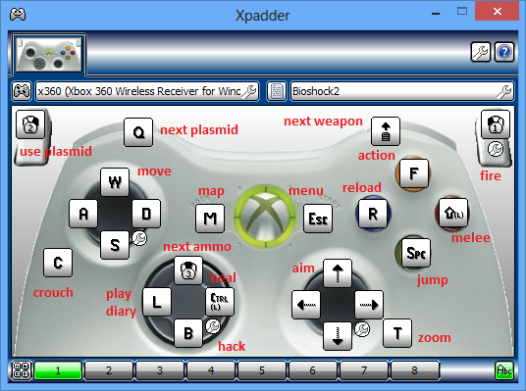
Bioshock 2 – xPadder profile – for xbox 360 controller

Edit: Most people won’t need this anymore, as Bioshock 2 now finally includes native controller support! Steam versions of the game should already be updated. Existing versions also include Minerva’s Den free!


Image

xPadder allows you to use controllers with games that only support keyboard and mouse. You can share profiles for games and controller.

Here’s the best one I’ve found for Bioshock 2, with some minor improvements:

Bioshock2.xpadderprofile

(NOTE: This is just a .xpadderprofile with a dummy extension to get around some silly upload restrictions. Remove the .docx extension from this file and open it in xpadder to use it.)

This will work with Bioshock 2’s default key bindings, so no fiddling needed.

It improves on one I found online, it’s about as good, and intuitive, as possible.

Solution for “None of the cipher suites supported by the client application are supported by the server”

My SSL requests failed when the client was Windows Server 2003, and the server (a win7 box) showed this error in the event log:

An TLS 1.0 connection request was received from a remote client application, but none of the cipher suites supported by the client application are supported by the server. The SSL connection request has failed.

I spent days trying to fix it, trying about twenty different things. In the end, the real solution was to generate the SSL certificates again from scratch, this time forcing RSA and SHA1 (though SHA1 should be the default anyway). I used:

makecert -pe -r -ss my -sr localMachine -n “CN=[domain name or IP address]” -e 01/01/2099 -a sha1 -eku 1.3.6.1.5.5.7.3.1 -sky exchange -sp “Microsoft RSA SChannel Cryptographic Provider” -sy 12

Here is what all the switches mean:

-pe include private key

-r self-signed

-ss my put cert into “Personal” certificate store

-sr localMachine use local machine’s cert stores (not current user’s)

-n common name (external IP or domain name of server)

-e expiry date

-a sha1 use SHA1

-eku 1.3.6.1.5.5.7.3.1 enhanced key usage Object Identifier (OID) for “SSL server certificate”

-sky exchange cert is for key exchange

-sp “Microsoft RSA SChannel Cryptographic Provider” use RSA

-sy 12 CryptoAPI provider type

For some reason Win Server 2k3 couldn’t or wouldn’t use the right ciphers with a default makecert certificate.

Hope this helps someone.

Your safety line

Let’s say you get a job washing windows on skyscrapers. During training you’re shown your safety line, a new type of super-strong wire that attaches your personal harness to a hook far above you… but looks exactly like a single human hair.

It’s going to be the only thing between you and falling hundreds of feet to your death.

Despite your trainer seeming trustworthy, and other employees assuring you it’s safe, you doubt. The stakes are too high, and the appearance of the wire too uncertain, for you to believe completely enough to trust the safety line. Your life is on the line (literally) and you’ve never seen something so thin that was that strong. At this point, you can choose to disbelieve the trainer, and walk out. But if you do want this job, listening to others isn’t enough. You have to try it out.

First you pull as hard as you can on the wire. Surprised at it’s strength, you gain confidence to tether yourself to practice hooks only a few feet from the ground. When that holds, you try throwing your whole weight on it, jumping around, hooking it to higher hooks.

After a day of this, you realise the wire is exactly as strong as you were told, and you try it from a skyscraper 200 feet up. Your mind still fears, but the evidence seen so far helps you choose to do what you want to anyway. After a month on the job, you trust your life to that wire without hesitation.

Your friends may be shocked when you describe your safety line to them, but you can’t doubt it’s strength anymore. You have too much evidence.

This is how faith in God works. If you accept the possibility that scripture is true, and try out what it tells you, you gain confidence in it.

The seed analogy in Alma 32:26-43 explains it well.

Like any principle of the gospel, there’s nothing magical or mysterious about faith. It’s just understanding how fickle the human mind is about accepting some facts and building your confidence in the truth of something by testing it out over and over.

DIY mitre join on an IKEA Pragel bench-top

A reader requested I give details on how I did the DIY mitre join on my IKEA Pragel benchtop:

Warning: this was tricky, do at your own risk. Ask for clarification if you need it, I wrote it quickly and from years-old memory, but if enough people want it I can add more info. If it’s difficult, or you ruin your benchtop, don’t blame me for trying to help you.

  1. Carefully mark a 1cm x 1cm square for the diagonal cut (pencil on masking tape)
  2.  Cut the “male” piece, to the correct length (keeping an 1cm for the join!) with a $50 Ozito circular saw (upside down for a neater cut as saw cuts from the bottom, masking tape along cut on the top (now the bottom – where saw enters). ||
  3. Draw a pencil line joining corners of the 1cm square and cut it with a hand saw (new blade is best).  |/‾|
  4. For female piece, cut the 1cm square diagonal first very carefully with hand saw.  _/_______|
  5. On the bit to be removed, go 5cm along from that cut (in step 4) and carefully cut 1cm in. _/_|______|
  6. Circular-saw the 1cm thin cut-out piece from the edge to that cut (in step 5). (Actually I used a router, but the cheap circular saw cut cleaner and straighter). _/_|
  7. Use the handsaw again for the last 5cm from the step 5 cut to the step 4 diagonal cut. _/
  8. Hopefully (!) they fit together nicely now.
  9. Get 2 benchtop joining bolts from the kitchen section at Bunnings (you must see that 5$ bunnings flatpax DVD that shows how these work to understand the next steps).
  10. Mark 4 holes on the bottom, 2 each on each bench piece, about 8cm from the join edges (not sure it’s 8, check this with the bolts, circle edge should end up 1-2cm from join edge) and about 30% of the way along the edge so they are evenly spaced from each other and the edges.
  11. Use the biggest wood spade from Bunnings (32? 35?) to drill wide holes – only 1-2cm or so deep – for the “C” part of the benchtop fasteners.
  12. Drill/saw/route a hole for the bolt part of the bolts, from those holes to the join edges, so the bolts will work as you’ve seen in the video
  13. In the video, they say biscuit join for strength; I didn’t actually need to, just carefully matched heights of benchtop pieces and supported both from below near join
  14. Put it all in place for a “dry run” (semi-tight bolts but no glue) to see if any adjustment needed.
  15. Glue a line of glue (good wood glue or MRMDF glue – I used araldite but wouldn’t recommend, it dried super fast in my hot kitchen window sun, and I almost couldn’t tighten bolts in time!) along the middle of the join, and a small line of silicon along near the top of the join.
  16. Put together in place in kitchen, make sure it’s all perfectly level and tighten the bolts.
  17. Some silicon should squeeze out the top. Make sure the whole join is covered by silicon so no moisture gets in the top.
  18. Spray some spray’n’wipe over the silicone so it doesn’t stick to the benchtop itself (just the join) when you wipe the silicon off
  19. Wipe the excess silicon off with your finger (pausing to wipe finger with something as needed). Check glue bottle for drying times.
This gave me a processional-looking join that’s still holding up so far (3 years later). Much cheaper than $500+ per join for a pro job at the time.

Note: don’t forget to waterproof the underside of Pragel benchtops if near wet (sink, dishwasher, oven or cooktop) as said in Pragel’s instructions.

Quickly find out “how fast” a CPU or GPU is

You can easily spend dozens of hours researching performance on CPUs and GPUs.

But what if you don’t have dozens of hours? What if before you spend that much, you just want a general idea? Something to start from, so you can decide whether it’s even worth looking at an upgrade in the current market, like: “will doubling my GPU performance cost around $50 or around $500?” for example. How do we quickly find out roughly how fast a particular CPU or GPU is?

Here are 3 sites using 3 different methods that can quickly give you a general idea of performance. Mad props to the r/buildapc community for recommending some of these.

Tom’s hierarchy charts

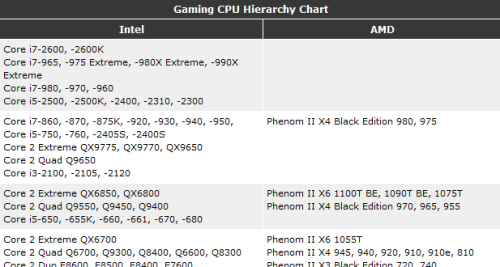
Included at the end of Tom’s “best value” articles for GPUs and CPUs published every month or two. Ranks parts by performance:

CPU hierarchy – July 2011 (check here for newer, if you’re reading this later)

GPU hierarchy – July 2011 (newer)

Pros

  • Quickly see if a C/GPU is faster than another
  • Based on a large number of benchmarks by a reputable team
  • Based on gaming performance (which is what most people want the performance for)

Cons

  • Can’t see how much faster it is (say GPU A is 2 tiers above GPU B – does that mean it’s 5% faster? 500% faster?)
  • The CPU charts only show somewhat recent CPUs (so I can’t see how my current machine compares unless I upgrade every few years – in which case I know a lot about recent hardware and probably don’t really need these charts).

AnandTech Bench

Also includes a nice price-performance graph, useful for those who live in the US and therefore can buy from NewEgg.

CPU benchmark results

GPU benchmark results

Pros

  • Gives and actual number (so you can see how much faster one C/GPU is over another)
  • Based on a large number of benchmarks by a reputable team
  • Can also select two C/GPUs and compare them in detail over dozens of benchmark tests

Cons

  • Can’t compare older hardware (such as your current PC, unless you upgrade frequently)

Passmark Lists

More comprehensive, but less accurate lists:

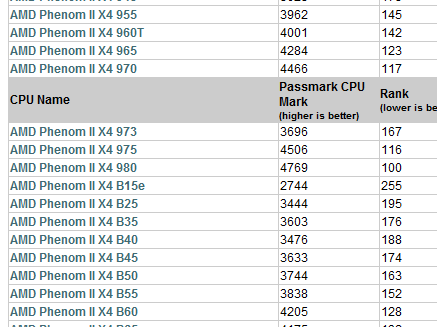
CPU list

GPU list

Pros

  • Gives and actual number (so you can see how much faster one C/GPU is over another)
  • Includes a large number of both desktop, notebook and server CPUs and GPUs, including very old ones for comparison
Cons
  • Benchmark is misleading in some ways: a quad core CPU is twice as fast as the identical dual core CPU (in real life applications, only very multithreaded apps will even approach that kind of speed gain)